改这个数据库的表pre_forum_threadmod,就可以删掉discuz移动标记
DELETE FROM `pre_forum_threadmod` WHERE `action`='MOV'再整理,再出发,人生是一段不休的自我救赎……
改这个数据库的表pre_forum_threadmod,就可以删掉discuz移动标记
DELETE FROM `pre_forum_threadmod` WHERE `action`='MOV'自动加载类文件时发生错误,类名【core\basic\Kernel】
这是由于Kernel.php 这个文件被误删除了,一般是阿里云的虚拟主机,阿里云那边认为这个文件有风险,可以重新上传这个模板。
方法:重新下载模板,随便选择一个pbootcms的模板都可以,下载后传到 /core/basic/ 文件夹里即可
————————————————
wordpress使用memcached缓存来加速网站
实测效果很好,网站速度比较慢的可以尝试下。
启用memcached缓存之前,首先在服务器安装memcached,并且在网站所使用的PHP里安装memcached扩展。
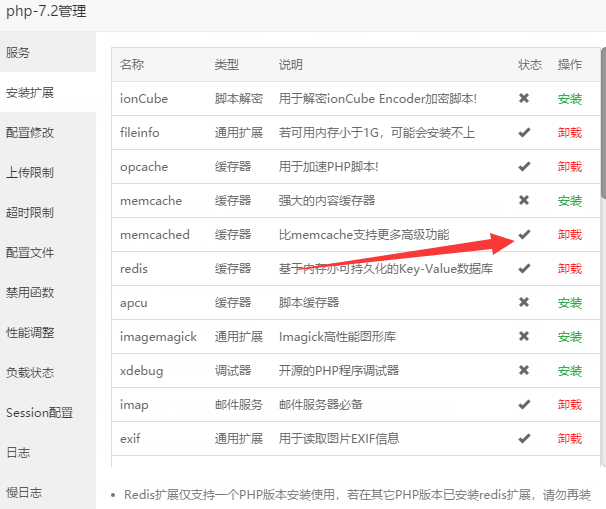
如何在服务器安装memcached应该不用多说了吧宝塔上点一下就安装了。安装完成后也不需要你做什么设置。
怎么看缓存有没有生效?
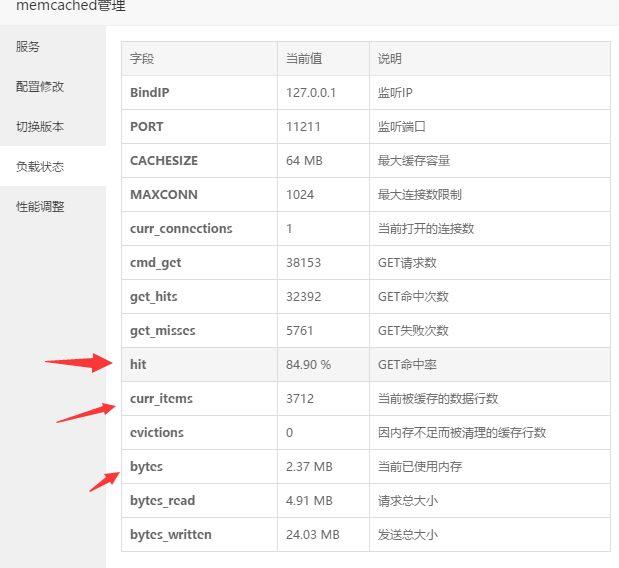
打开你的网站随便刷新几下,然后打开宝塔面板的memcached,看负载状态。
看下命中率,已使用的缓存等就可以知道了。
在网站根目录的wp-config.php文件内加入下面的代码
global $memcached_servers;

$memcached_servers = array(

array(

'127.0.0.1', // Memcached server IP address

11211 // Memcached server port

)

);
127.0.0.1是默认的本机memcached,一般不要改。11211是默认端口,也不用改。不对外使用的话服务器也不要放行这个端口。
启用计算机 F10 一键恢复出厂
计算机内置的 F10 系统恢复出厂功能,能短时间内帮您将计算机系统恢复到初始状态。
系统恢复出厂会删除 C 盘中数据(也包含桌面文件、下载、文档等个人数据),请您备份 C 盘内的个人数据。
将计算机连接电源,开机过程中长按或点按 F10 键。
进入界面后,根据界面提示进行恢复出厂。
开始-选项-信任中心-隐私选项-隐私设置-所有连接体验和下载联机内容的体验打上勾。再打开就会有联机模板啦
对nginx的rewrite文件写入如下内容,如果是宝塔面板,那么如下图所示添加,并保存。
location ~ ^\/.+$ {
if ($request_uri ~ ^/resources) { break; }
if ($request_uri ~ ^/images) { break; }
if ($request_uri ~ ^/index\.php) { break; }
rewrite ^/(.+)$ /index.php?title=$1 last;
}
or
location ~ ^\/.+$ {
if ($request_uri ~ ^/resources) { break; }
if ($request_uri ~ ^/index\.php) { break; }
rewrite ^/(.+)$ /index.php?title=$1 last;
}

然后再在 LocalSettings.php文件里面添加如下代码
# 伪静态
$wgScriptPath       = "";
$wgArticlePath = "$wgScriptPath/$1";
$wgUsePathInfo      = true;
$wgScriptExtension  = ".php";
1,在根目录里面放置404页面
2、在如下配置,去掉“网站设置” -=》 配置文件 =》404前置#号
#SSL-END
#引用重定向规则,注释后配置的重定向代理将无效
include /www/server/panel/vhost/nginx/redirect/www.emc.wiki/*.conf;

#ERROR-PAGE-START  错误页配置,可以注释、删除或修改
error_page 404 /404.html;
#error_page 502 /502.html;
#ERROR-PAGE-END打开:/source/class/discuz/discuz_application.php
搜索:
if(isset($_GET['formhash']) && $_GET['formhash'] !== formhash()) {
                        system_error('request_tainting');
                }
改为:
if(isset($_GET['formhash']) && $_GET['formhash'] !== formhash()) {
                        //system_error('request_tainting');
                          //header('HTTP/1.1 301 Moved Permanently');
                          header("Location: https://".$_SERVER['HTTP_HOST']."/member.php?mod=logging&action=login");
                          exit;
                }
备注:https根据实际情况修改http
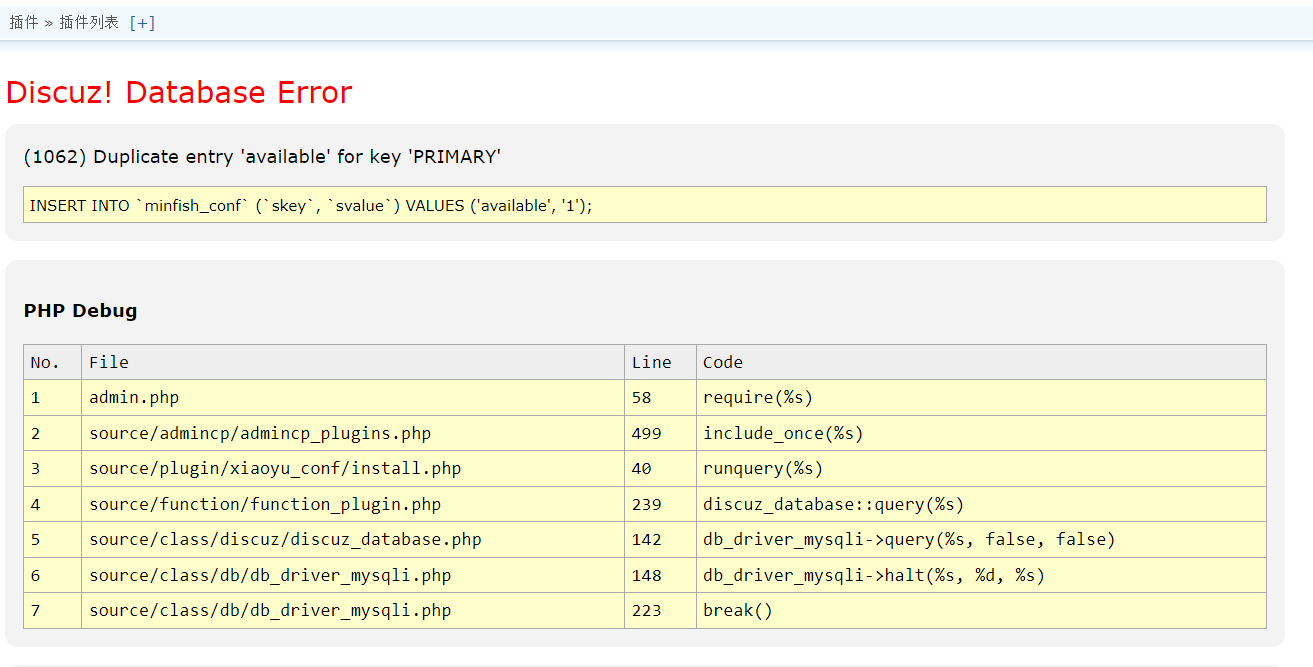
Discuz! Database Error
(1062) Duplicate entry 'available' for key 'PRIMARY'
INSERT INTO `minfish_conf` (`skey`, `svalue`) VALUES ('available', '1');
[1314]SEO之sitemap开启需要额外添加伪静态文件
Nginx Web Server
rewrite ^([^\.]*)/sitemap-([0-9]+)\.html$ $1/sitemap.php?module=forum&type=new&page=$2 last;
if (!-e $request_filename) {
    return 404;
}